
Many aircraft enthusiasts like to take pictures of the aircraft they see on spotting trips.
For some it is simply for a record of the aircraft they’ve seen. For others, it is to create stunning, artistic images which show how amazing these flying machines are.
Understandably, very few of us are professionally trained photographers. But I think we’d all love to take better pictures. So here are some easy tips on improving your aircraft photographs.
Get to know your camera modes

It’s great to have an expensive, feature-rich camera with all the latest settings and gizmos. But these are irrelevant if you don’t use them as intended.
Digital SLR cameras have different modes for different scenarios, and spending a bit of time getting to know what each of them do will unleash many benefits and rewards to your photographs.
I you look on your camera, you will usually have a little dial with letters or diagrams around it. AUTO (or a green square) is Automatic mode, and usually the go-to setting for new photographers.
However, taking pictures on automatic mode will rarely yield the best photographs as taking pictures of moving objects usually requires a more specialist setting.
You can use Automatic for stationary aircraft on the ground, but again you may wish to try other settings. Such as:
A (or Av) is Aperture Priority mode. This is useful for photographing aircraft moving in the air, such as approaching a runway or on takeoff.
S (or Tv) is Shutter Priority. Similarly, this is also good for photographing aircraft moving in the air, but better for propeller planes as it can keep the props blurry (whereas A mode will stop them).
P is Program Mode. In this case the camera will automatically choose the shutter speed and aperture (the amount of light being let in). This, in my opinion, is better than AUTO for taking pictures of aircraft on the ground, but it’s not as good for faster moving objects in the air.
Camera modes is an art unto itself, and every photographer has preferences. You can also override each setting with different shutter speeds and apertures, so it’s all about experimentation.
Use decent photo editing software
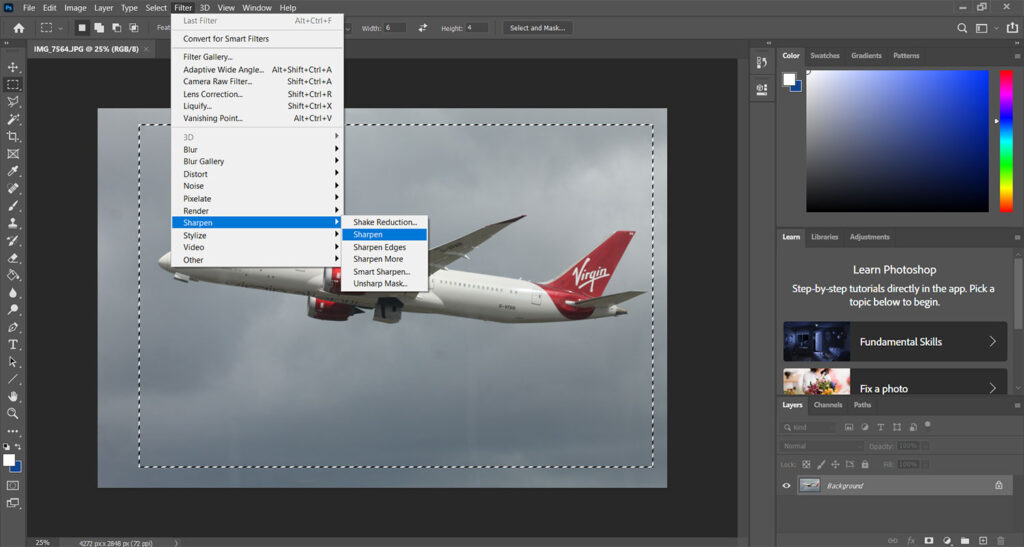
Sadly the picture you take on the day will not always be the perfect, finished product. But unlike the old film days, digital photography allows us to edit photographs to tweak them into something more presentable.
Free editing software comes with most computers, or can be downloaded from the web. But to improve your photographs, you should try a decent, more professional package.
I use Adobe Photoshop, which is widely accepted as the best on the market and has been around for years. Thankfully with a bit of practice you can get to grips with the basics of improving your photographs quite quickly.
Taking pictures on RAW format (see later) helps to give you more control over the edits you can make.
You will also be able to do the following:
Crop – make sure the aircraft is centred in the picture.
Sharpen – if there’s any blur you can usually improve this, making the picture sharper and more impactful.
Remove unwanted clutter – sometimes a light pole, person, tree branch or other object can detract from the picture. Photo editing software allows you to remove these fairly easily.
Adjust colours and exposure – Editing the exposure of your picture is easy, and you can also adjust the colours or make the picture more vibrant to bring it to life.
Invest in the best lens you can afford
Professional photographers will always tell you that the lens is the key part to taking better pictures.
Camera bodies are great, and it’s good to get a modern one with lots of features and good reviews. But the higher quality of lens means higher quality of glass and other features, like image stabilisation and focus. This in result gives you sharper, clearer pictures.
So always choose the best lens you can afford.
Decide which focal length you need. I prefer to have a shorter 28-70mm lens for close-up shots, and a longer lens (300mm minimum) for photographing aircraft further away.
Do some research and look at reviews for the lenses you’ve identified.
Pick spotting locations based on light
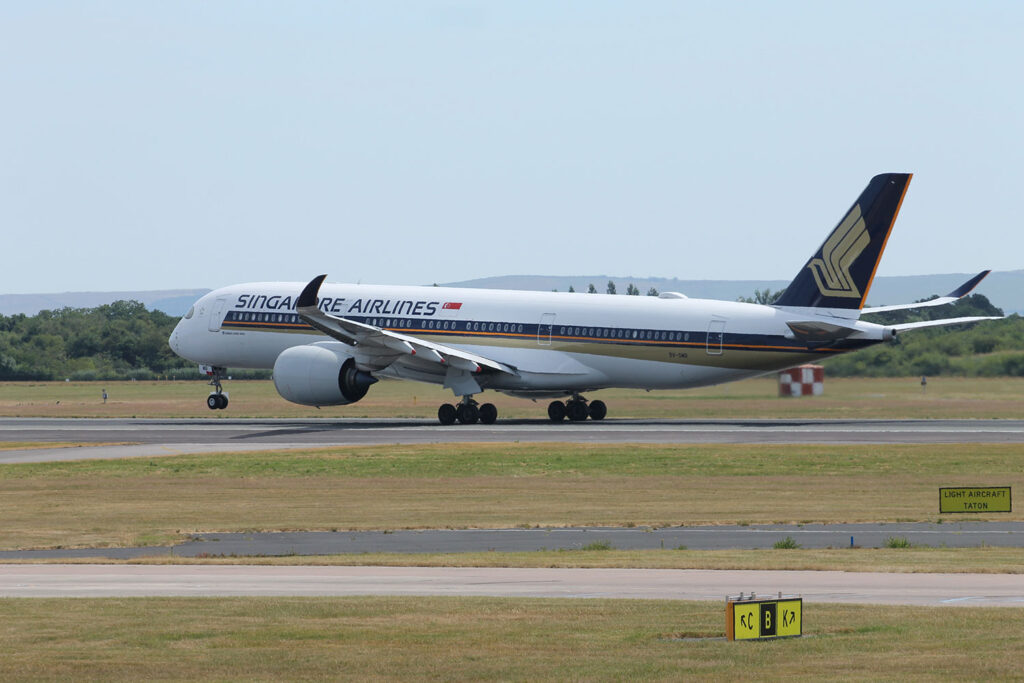
A backlit aircraft photograph like this is not as vibrant. Sadly the viewing location looks towards the sun.
On a more practical level, you’ll find you take better aircraft photographs if you choose your location well.
Sadly many official spotting locations and observation terraces are not ideally positioned. They will often face into the sun, meaning your photographs are backlit and the aircraft dark. This is often hard to correct in editing software.
So look for locations where the sun is predominantly going to be behind you, meaning the aircraft are well lit and vibrant.
Most spotting guides will tell you when a location is bad for photography. If in doubt, looking it up on a map and work out where the sun will be (remember, it rises in the east and sets in the west, and is usually more southerly in the sky the higher north you are or northerly in the sky the further south you are).
Take pictures in RAW format
A final tip for taking better pictures is to set your camera in RAW mode (if it has it).
This goes hand in hand with using photo editing software to improve your pictures after taking them.
Unlike standard JPEG or other picture modes, RAW does not do any processing in the camera itself. It simply records all of the raw data of the picture you took from the camera. Then, when you load it up on your computer, you can tweak every aspect of it, from exposure to colour balance, without losing and quality.
It is also easy to make images sharper, but it cannot correct large amounts of blur or movement.
RAW is usually changed in your camera’s menu under Picture Format.
I hope these provide some useful tips on taking better aircraft photographs. You can try them all, or just pick one or two to test out as you try to improve your pictures.
Do you have any tips to add to the list? What helped you take better pictures? Leave a comment below!
Author


4 comments
One of the many challenges facing “on the ground” photos is all the ground equipment and buildings etc that can be a cause of distraction.
Often there is nothing you can do about that if changing location isn’t possible.
But a key thing you can improve is the actual image of the aircraft ,say when taxying.
One of the issues I encounter with some photographs is the wheels get lost in the grass on the taxiways or runway signage impinges some part of the image. Of course this maybe resolved in post – processing but there are limits in what can be done.
So its a good idea before shooting that elusive image, type , colour scheme etc. to do a few prep. shots with other planes passing by to find a out where best point to shoot is within the frame. It may well be just slightly before full side view of at a point where the subject just turns at a given point. Or on take off it could be a few hundred meter down the runway, whereas a side view wouldn’t provide unobstructed image.
Often just a split second makes the difference from a full open picture to one with items interrupting that perfect shot.
Of course shooting multiple images at once might work depending on your camaras capability but if shooting in RAW there might be a slight delay in the buffer to storage card which could delay that perfect point to shoot.
If you discipline yourself to look beforehand at these potential hinderances , the final results will be more satisfying.
Of course its not alway possible to accomplish this simply because of the location, prevailing light or the aircrafts movements.
But that is the interesting challenge that makes the capture of an image either a “record” shot or a great result!
Great tips. Thanks Julian!
Personally, I do not necessarily mind ground equipment. It adds life to your pix and places the aircraft in its wider context. I also suggest that you combine your pictures with postcards…
“A (or Av) is Aperture Priority mode. This is useful for photographing aircraft moving in the air, such as approaching a runway or on takeoff.
S (or Tv) is Shutter Priority. Similarly, this is also good for photographing aircraft moving in the air, but better for propeller planes as it can keep the props blurry (whereas A mode will stop them).”
it’s somewhat wrong
Av is ONLY mode for shooting planes (or helos) in flight
when you see jet is coming, you can set one of fast shutter speeds (1/800 or 1/1000 or even shorter) depending on light and aperture of your lens
and, when you know prop is coming, you simply change speed to 1/400 1/250 or even longer, depending on your IS, lens’ focal length and personal wish (more blur or less).
Well, if you shoot helos, especially hovering (!) and have IS stage 4 (Canon) in you lens, you can set speed as low as 1/60 and EVEN 1/30!!!
It provides you with truly fantastic shots which you will be proud of.
returning to your idea of using Tv for propeller planes, I GUARANTEE that it’s absolutely real to set aperture to (say) 11 and (with full sun and ISO200) get shutter speed in range 1/800-1/1000. It effectively stops all propellers to “dead sticks” so kills your photo sequence with this plane
sorry for bad English 😉